Saturday 16 February 2013

Sexism and the social networking sites...

Today's post is not intended to be a rant, but may well swing that way as I am writing as I think. I am interested in a lot of things that are stereo-typically aimed at teenage girls, but at the moment one of my primary interests is studying feminism. Sadly however I am extremely concerned that many teenage girls are not as bothered or maybe have not had the chance to become informed on these issues. This is beginning to become a real problem in society and something that keeps being bought to my attention. Don't get me wrong I know the internet can be great and I use it a lot myself but some people need to seriously revise the way they use it.
 I regularly scroll through my facebook news feed and discover all kinds of abusive terms or generalising statements. Facebook has given birth to even more ways to insult and label women, but shockingly, in my experience these abusive terms are coming from all kinds of people including women. I am personally offended by the amount of times I am coming across the word C**t when I am on facebook. The worst part is, I am not at all shocked when I see it being used. Facebook has always been a breeding ground for abusive behaviour but this one word seems to be rearing its ugly head far too often. Germain Greer was quoted saying "It is one of the only words in the English language, with a genuine power to shock..." but I wonder whether it does anymore. I wonder whether we will continue to use this term and others like it, on our social media sites so they leave a permanent footprint on our society? The people who argue that we have become a lot closer to female equality in the past ten years are clearly failing to recognise the massive impact that these sites have had on any potential development. Technology is advancing and so people have the ability to project hateful comments and belittle woman with sexist images with the click of a button. This has resulted in horrific tweets and viral images that spread around the globe at a rapid rate. Hashtags such as "Thatswhatslutsdo" and "Itsnotrapeif" have become trending topics in the world of twitter. It is really important we start spreading the knowledge of how damaging this kind of thing can be on individuals and groups of women.  

Rant over,
J and M xx

Saturday 9 February 2013

Gradient heart nail tutorial.

Well hello there! Valentines day is coming up very soon and whether you're     watching a Rom-Com and crying over Ashton Kutcher *sob* or you have a special day planned, it is the perfect opportunity to dress up your nails. I have gone with hearts, because in my opinion, the more clichéd the better at this time of year. If you want to go crazy you could attempt other more complicated designs aswell... perhaps your crushes face? Erm okay... maybe not.
Enjoy! 

Firstly, gather your equipment. 
You will need:
- A make-up sponge
- A very fine paintbrush, or a black nail art pen.
- A base colour, I have gone for lilac.
- Three shades of one colour. I have chosen blue, but you could go with any colours as long as you have a pale one, a medium one, and a dark one.
- A clear topcoat.
- Cotton wool bugs, (to clear up any mess around your nail.)
- Small scissors
- Masking tape, (it is important you use a tape that is not too sticky, as it may rip off your base coat.

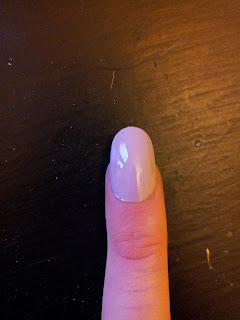
Paint your base coat onto your nail.
Okay, here we go. Make sure that before you start painting your nails you make sure that they are clean and prepped. Normally I remove all of my previous nail polish with acetone free nail polish remover, as this will stop your nails going as dry or brittle. Then, I file them, buff them, and put a little bit of nail cream on them. This will just stop them drying out and keep them in healthier condition. I would recommend 'Burt's Bees Lemon butter cuticle creme'. Paint on your base colour and wait for it to dry.

Cut a heart out of your masking tape.

Rip off a little finger sized strip of tape. Make sure that it isn't too sticky, then fold it gently in half, making sure it doesn't properly get stuck together. Grab your scissors and cut half of a heart on the folded edge. Make sure that your heart isn't too big, or else it won't fit on your nail.

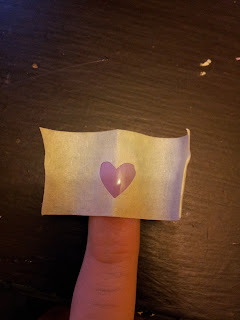
Place the tape onto your nail.
Open out your tape and place the heart in the middle of your nail. You don't want to peel it off at the end and realise it's lopsided.

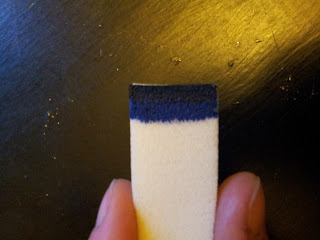
Paint the darkest colour onto the edge of your sponge.
Now get your sponge and the darkest shade of your nail polish. Paint a thin strip onto the edge of the sponge.

Paint the middle shade next to it.
Do the same next to it with the middle shade.

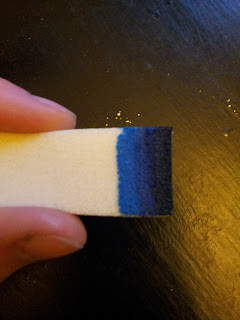
Paint on the lightest shade.
Paint on the lightest shade next to that. If you want to, you can do a small strip of white next to that, however the heart is quite small and it won't make much difference to the effect. Make sure you do this whole process fairly quickly, as the sponge will absorb the polish.

Sponge the polish onto some paper a few times.
Dab the sponge onto a piece of scrap paper a few times, to blend the colours together. This will make a better gradient. (Sorry for the crappy picture.)

Sponge the gradient onto the heart.
Then, get dab the sponge over the heart shape on your nail. Make sure that it goes from dark, to light.

Peel off the tape.
Carefully, peel off the tape. And voilà! You should have a cute little heart. If the edges aren't as sharp as you would want them to be, get one of your cotton wool buds and a tiny bit of nail polish remover and wipe off any imperfections. BE CAREFUL with this though, you may end up wiping of smudging the heart or base colour.

Now, you can either leave it like this, and simply paint a topcoat over it. OR you can be extra jazzy and do what I did:

Get your paintbrush and a small blob of black nail polish.(Alternatively you could use a nail art pen.)
 Put a small blob of black nail polish on a piece of scrap paper and get your paintbrush, (Or you can use a black nail art pen.)

Paint a thin line around the edge.
Dip your paintbrush in the polish and carefully draw a thin line around the heart. I think it makes the design a bit more interesting and pretty darn beautiful, but whatever floats your boat. Finish off by painting a topcoat over the top to seal the design and stop your hard work from chipping and hey presto!! (Don't forget to clean your brush though, otherwise it will set and become rock hard and unusable. )

Happy Valentines! From J&M xx

Friday 1 February 2013

1930's Inspired Makeup Tutorial.


So today I decided to sit down and kick start this here blog. At the weekend Matilda and I were experimenting a lot with my new camera and lighting (more on this later), and we thought that the best way to test the picture quality would be by doing a makeup tutorial, so here it is...

To start, make sure the skin is cleansed and well primed. For this look, it is important to start fresh faced.

Apply your foundation smoothly across the face being sure to blend well. Apply concealer to any blemishes, areas of redness and under the eyes. To finish, dust a light powder across the whole face.
Using an eyeshadow brush, dust the lid with a neutral shade with a light shimmer. Then using a smudge or blending brush, work some light brown towards the outer corner of the eye.
Next apply a fine black liner across the lash line.
Long fluttery eyelashes were very popular in those days so a lengthening clear mascara could be applied before the black. You could also use eyelash curlers to extend the lashes even more. After this apply a lot of black mascara.
Next, use a coral or rose coloured blush to contour and highlight the cheeks. A rosey complection was very fashionable in the '30's.
Eyebrows were extremely thin so fill them in using a pencil or brush.
Finally, finish the look with a light red gloss or shiny lipstick.


J and M x